
The Jigsaw Method: A Step-by-Step Classroom Guide
The jigsaw method is a cooperative learning strategy that sounds complicated on paper but clicks the moment you see it in action. In short, students split into “expert groups” to learn one piece of a topic, then return to their “home groups” to teach it to everyone else. Every student becomes responsible for part of the learning, so no one can tune out.
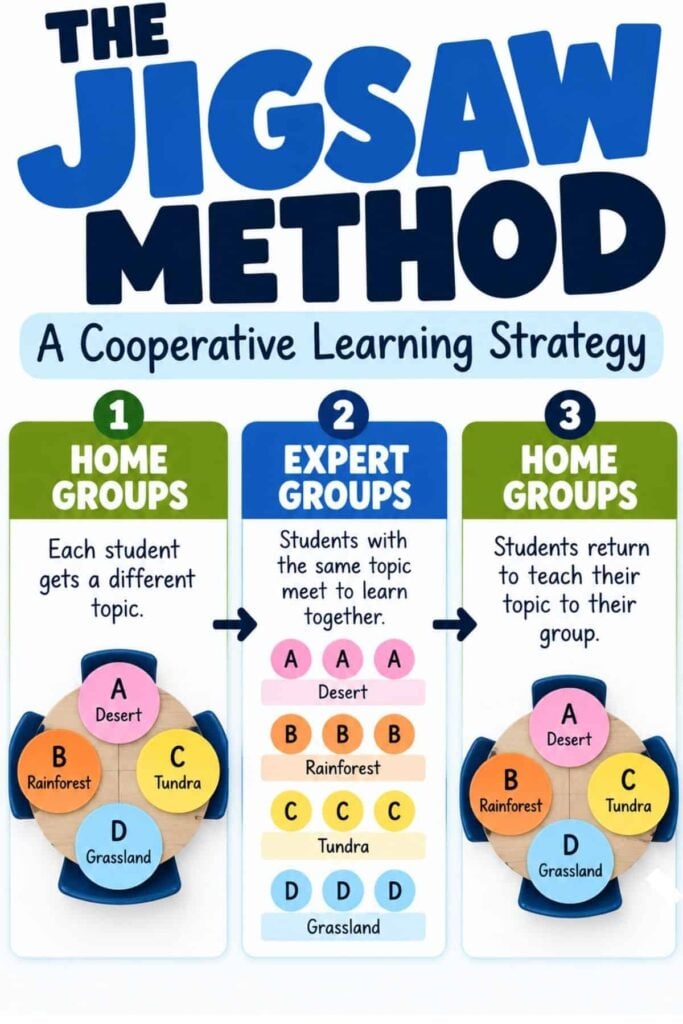
This guide explains what the jigsaw method is, where it came from, how to run it step by step, a full classroom example you can copy, and the problems that come up so you can head them off before they do.
What Is the Jigsaw Method?
The jigsaw method is a cooperative learning strategy in which each student becomes an expert on one part of a topic and then teaches that part to their group, so the whole topic comes together like pieces of a puzzle. The class works in two kinds of groups: home groups, where students start and finish, and expert groups, where students who share the same sub-topic meet to learn it together. Because each student holds a piece no one else in their home group has, every student has a real reason to speak and to listen.
Who Developed It: Elliot Aronson
Social psychologist Elliot Aronson and his graduate students developed the jigsaw classroom in Austin, Texas, in 1971. You can read more about its origins on Aronson’s jigsaw classroom site.
Why It Was Created
Austin’s schools had recently desegregated, and classrooms were tense and competitive. Aronson designed the jigsaw method to make students depend on one another instead of competing, since they could succeed only by listening to and learning from classmates. The structure made cooperation necessary, not optional, and it changed how students treated each other. That same interdependence is why the strategy still works in any classroom today.
How the Jigsaw Method Works: Step by Step
The jigsaw teaching strategy follows the same sequence every time. Once students know the routine, it runs smoothly. The full cycle usually takes one to three class periods depending on the topic.
- Divide students into home groups. Make groups of four to six students, mixed in ability. These are the groups students will return to at the end.
- Assign each student one sub-topic. Break the material into one piece per group member, so each student owns a different part.
- Form expert groups. Students leave their home group and meet with others who have the same sub-topic. All the “biome 1” students sit together, and so on.
- Expert groups study together. In their expert group, students research, discuss, and clarify their piece, build shared notes, and decide how they will teach it.
- Return to home groups and teach. Students go back to their home group and take turns teaching their piece. By the end, the group has covered the whole topic.
- Hold students accountable. End with a short quiz, written summary, or project so every student is responsible for the full topic, not just their piece.
Group formation goes faster when you plan it ahead. My post on strategically pairing and grouping students has ways to set up mixed groups quickly.
A Jigsaw Classroom Activity Example
Here is a full jigsaw activity you can copy. Say you are teaching a social studies unit on famous explorers. Set up home groups of five students, and assign each student one explorer to become the expert on. All the students assigned Magellan leave and form an expert group together, where they read about Magellan, build a shared set of notes, and plan how to explain him. The same happens for Columbus, Hudson, and the others. Then every student returns to their home group and teaches their explorer in turn. By the end, each home group has learned about all five explorers, and every student taught one of them.
The same structure works in science. For a unit on ecosystems, give each home group member one biome, like the desert, rainforest, or tundra. Expert groups build notes on their biome, then students return home to teach it, so each group ends up comparing all the biomes. Whether the content is humanities or science, the jigsaw method turns one big topic into pieces students assemble together.
Benefits of the Jigsaw Method
The jigsaw method earns its place because of what the structure forces. A few benefits stand out:
- Real interdependence. No student can finish the task alone, so everyone has a stake in everyone else’s success.
- Every voice is used. Each student has a piece only they can teach, which gives quieter students a built-in reason to speak and be heard.
- Oral language and listening grow. Students practice explaining and questioning, the kind of academic talk that builds understanding.
- Better relationships. Aronson’s own research with colleagues (Blaney, Stephan, Rosenfield, and Sikes) found that jigsaw classrooms reduced prejudice and increased how much students liked one another in mixed groups.
Because it meets students at different levels within the same lesson, the jigsaw method also fits neatly into a broader differentiated instruction approach.
Disadvantages and Common Problems
The jigsaw method is powerful, but a few predictable problems can derail it. Knowing them ahead of time lets you build in the fix.
- Absent students leave a gap. If a student is out during the expert phase, their home group is missing a piece. Fix: keep backup notes or a one-page summary for each sub-topic so you can fill the gap.
- Uneven participation and free-riding. Shy or weaker students may under-participate, and a confident one may take over. Fix: use individual accountability, like a short exit ticket or a two-question quiz, so every student shows what they learned.
- Misunderstandings spread. A student who gets their piece wrong in the expert group can pass that error to the whole home group. Fix: spot-check each expert group before they return home to catch and correct mistakes at the source.
Tips for Running a Successful Jigsaw Activity
A few small moves make the difference between a jigsaw activity that hums and one that stalls:
- Number students ahead of time. Assign each student a number 1 to 5 before class to make forming expert groups quick: “all the 3s, meet at the back table.”
- Match the reading to the reader. Keep each expert group’s text at a level students can actually read, so they can come back and teach it.
- Give expert groups a graphic organizer. A short template to fill in before they teach keeps the expert phase focused and gives students notes to teach from.
- Time-box each phase. Post the time for expert work and teach-back on the board so groups keep moving.
- End with a home-group recap. Have each student summarize one thing they learned from a peer to reinforce the teaching and surface gaps.
One variation worth knowing is the reverse jigsaw, where expert groups also solve a problem or reach a conclusion together before returning home, which adds a layer of higher-order thinking. Since the jigsaw method has students talking in two different groups, plan for the volume.
My post on managing group discussion noise pairs well, and if you like puzzle-based group work, my classroom puzzle activity and the Four Corners strategy are other cooperative options.
Frequently Asked Questions About the Jigsaw Method
Bringing It All Together
The jigsaw method works because its structure does the heavy lifting: when every student holds a piece no one else has, participation stops being optional. Set up home groups and expert groups, build in a quick accountability check, and plan for the absent student and the quiet one, and you have a cooperative learning strategy you can run this week. Start with one lesson you already teach, break it into pieces, and let your students put it back together.
Jessica BOschen
Jessica is a teacher, homeschool parent, and entrepreneur. She shares her passion for teaching and education on What I Have Learned. Jessica has 16 years of experience teaching elementary school and currently homeschools her two middle and high school boys. She enjoys scaffolding learning for students, focusing on helping our most challenging learners achieve success in all academic areas.